The Border Gateway Protocol (BGP) is a highly intricate routing protocol renowned for its complexity. Before delving into the process of configuring BGP, it is essential to establish a strong foundational understanding of this protocol, encompassing both its iBGP (Internal BGP) and eBGP (External BGP) variants.
BGP Configuration
To set up BGP, the procedure involves the following steps:
- Commence by configuring the relevant IP addresses across all routers;
- On R1, activate the BGP process and designate an Autonomous System Number (ASN). For instance, use ASN 1000:
R1(config)#router bgp 1000
- Subsequently, specify the neighbor router’s address and its corresponding ASN:
R1(config-router)#neighbor 10.10.10.2 remote-as 1000
R1(config-router)#exit
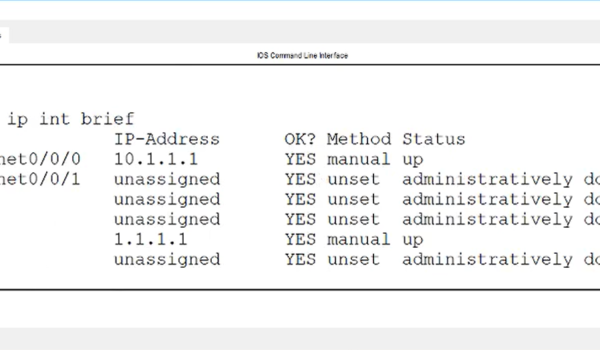
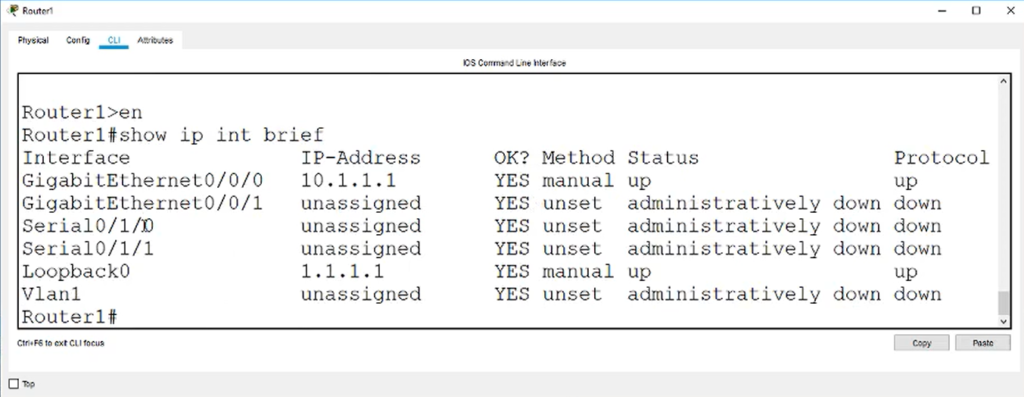
- The illustration below displays the BGP setup on R1.
- Proceed to R2 and enter the subsequent commands to activate the BGP process and define its Autonomous System Number (ASN).
R2(config)#router bgp 1000
- Following that, use the following command to indicate the neighbor router’s IP address for iBGP.
R2(config-router)#neighbor 10.10.10.1 remote-as 1000
- Subsequently, issue the following command to designate the neighbor router for eBGP.
R2(config-router)#neighbor 20.20.20.2 remote-as 2000
Note: For enhanced stability, it is advisable to employ a loopback interface as the update source. Unlike physical interfaces that may encounter shutdowns or cable disconnections, the loopback interface remains operational regardless of cable status, connector issues, or link conditions.
- Proceed to execute the subsequent command to define the update source interface for the neighboring router.
R2(config-router)#neighbor 20.20.20.2 update-source loopback0
R2(config-router)#exit
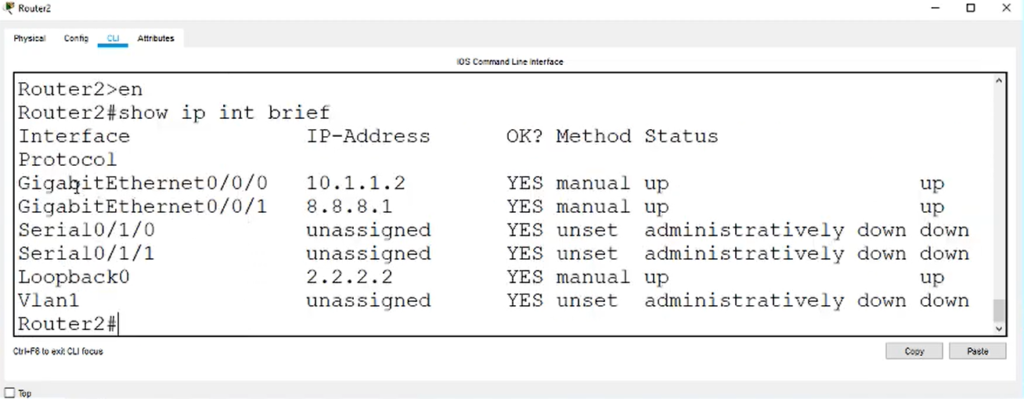
- The depicted diagram illustrates the BGP configuration on R2.
- Next, proceed to R3 and follow these commands to activate the BGP process and specify its ASN:
R3(config)#router bgp 2000
- Then, execute this command to specify the neighboring router and its ASN:
R3(config-router)#neighbor 1.1.1.1 remote-as 1000
- Since we’ve employed the loopback0 interface of R2 as the update source interface, it places R2 two hops away from R3. However, BGP typically assumes that external peers are only one hop away. You can modify this behavior by enabling the eBGP multihop feature. To manually specify the custom number of hops, use the following commands:
R3(config-router)#neighbor 1.1.1.1 ebgp-multihop 2
R3(config-router)#exit
- To use a loopback interface as an update source, R3 must possess a route to R2’s loopback in its routing table. You can achieve this by adding a static route. Execute the following command to do so:
R3(config)#ip route 1.1.1.0 255.255.255.0 20.20.20.1
- These steps ensure that R3 can effectively use R2’s loopback interface as the update source for BGP.
- After successfully configuring BGP on all routers, it’s time to validate your setup. To accomplish this, issue the following command on any router and assess the displayed output, as depicted in the figure below:
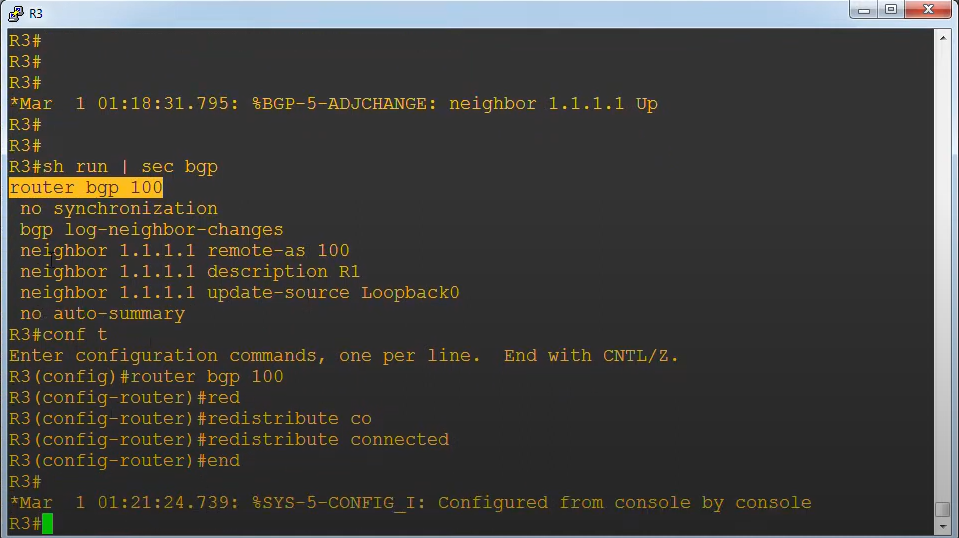
Alt: router 3 configuration – coding
R3#show ip bgp neighbors
Setting Up BGP Timer Values
In the realm of networking, the Border Gateway Protocol (BGP) plays a pivotal role in routing decisions, making it essential to fine-tune its parameters for optimal performance. One crucial aspect of BGP configuration involves adjusting the Keepalive and Hold Down timers.
By default, BGP sets the Keepalive timer to 60 seconds and the Hold Down timer to 180 seconds. However, these values are not set in stone; they can be globally modified to align with the specific requirements of your network.
For example, if you aim to enhance responsiveness by reducing the Keepalive timer to 10 seconds and minimize convergence time with a Hold Down timer of 30 seconds, you can achieve this through the following commands:
R3(config)#router bgp 2000
R3(config-router)#timers bgp 10 30
The ability to fine-tune these timers empowers network administrators to optimize BGP behavior in accordance with their network’s unique demands. The illustration below provides a visual representation of the process involved in adjusting these critical BGP timers, highlighting the importance of this configuration for efficient network operations.
Conclusion
Configuring BGP in a lab environment necessitates a thorough understanding of its intricacies, encompassing iBGP and eBGP configurations. This guide has outlined the key steps, from defining Autonomous System Numbers to configuring update source interfaces and adjusting BGP timer values. These skills are invaluable for network administrators, as they enable the optimization of BGP behavior to align with specific network requirements, ultimately enhancing network responsiveness and convergence times. Armed with this knowledge, you are well-equipped to tackle real-world networking challenges and ensure the efficient and reliable functioning of your network’s routing decisions.